Picture this: you’re relaxing on your new deck with a cold drink, and right there in the middle is a beautiful tree providing shade and character. Sounds amazing, right? Building a deck around a tree transforms your outdoor space into something special, but it takes careful planning to pull it off.
Let’s walk through everything you need to know.
Why Build a Deck Around a Tree?
Trees add life to any outdoor living space. They provide shade on hot summer days, improve air quality, and create a natural focal point that makes your deck feel less like an add-on and more like part of the landscape.
But here’s the thing: you can’t just build around any tree and hope for the best. The tree needs room to grow, and your deck needs structural stability. Get it wrong, and you’ll end up with either a dying tree or wobbly railings. Sometimes both.
Before You Start: The Planning Phase
Check Your Local Building Codes
Before you dig a single hole, contact your local building department. Most areas require permits for deck construction, and North Carolina’s building codes regulate deck requirements to ensure safety. Skipping this step could mean tearing down your finished deck, and nobody wants that headache.
You can find specific requirements through resources like the North Carolina General Statutes, which outline when permits are necessary. Most decks over 30 inches high will need one.
Evaluate the Tree’s Health
Walk up to your tree and take a good look. Is it healthy? Are there dead branches, visible rot, or signs of disease? A sick tree won’t support the investment you’re about to make. If you’re not sure, bring in an arborist. They can tell you if the tree will survive having a deck built around it.
Consider future growth too. That six-inch trunk will be ten inches in a few years. Plan accordingly.
Measure and Plan Your Deck Layout
Grab your tape measure and start planning. You’ll want to:
- Determine the deck’s overall size
- Figure out where deck posts will go (hint: nowhere near tree roots)
- Decide if you want a square or rectangular deck
- Map out the tree opening with enough space for growth
Most experts recommend leaving at least two to three feet of clearance around the trunk. This accounts for future growth and prevents damage to tree roots during construction.
Materials You’ll Need

Here’s what should be on your shopping list:
| Material | Purpose | Pro Tip |
| Pressure-treated lumber | Deck frame, joists, posts | Use high-quality materials rated for ground contact |
| Composite decking or wood deck boards | Surface decking | Composite requires less maintenance |
| Concrete deck blocks or poured footings | Foundation support | Must go below the frost line in your area |
| Joist hangers | Connect joists to rim joists | Use construction screws, not nails |
| Deck screws | Fasten deck boards | Hidden fasteners create a cleaner look |
| Fascia boards | Cover exposed frame | Finishing touch for a professional appearance |
If you’re curious about different decking material options and how they affect your project, our guide on building codes and requirements breaks down what’s approved in North Carolina.
Step-by-Step: Building Your Deck Around a Tree
Step 1: Mark Your Deck Design
Start planning by marking the perimeter of your new deck with spray paint or chalk lines. Use batter boards and string to create straight lines and ensure your layout is square.
Double-check your measurements by measuring diagonally from corner to corner. If both diagonal measurements match, you’ve got a perfect rectangle.
Step 2: Locate Post Locations (Avoiding Tree Roots)
This step matters more than you think. Tree roots extend far beyond the trunk, often 2-3 times the width of the tree’s canopy. Digging near major roots can seriously harm the tree’s health.
Mark your post locations, then carefully probe the ground with a post hole digger before committing. If you hit roots, adjust your design. Sometimes a floating deck works better than a traditional attached deck because you avoid digging entirely near the tree.
Step 3: Install Footings
Time to start digging those footing holes. Here’s what you need to know:
- Dig below the frost line (check local building codes for your area’s frost line depth)
- Use a post hole digger or auger for clean holes
- Pour footings with concrete for permanent support
- Add post base hardware before the concrete sets
A floating deck uses concrete deck blocks instead of poured footings, which means less digging and faster installation. Perfect if you’re trying to avoid rookie mistakes around sensitive root systems.
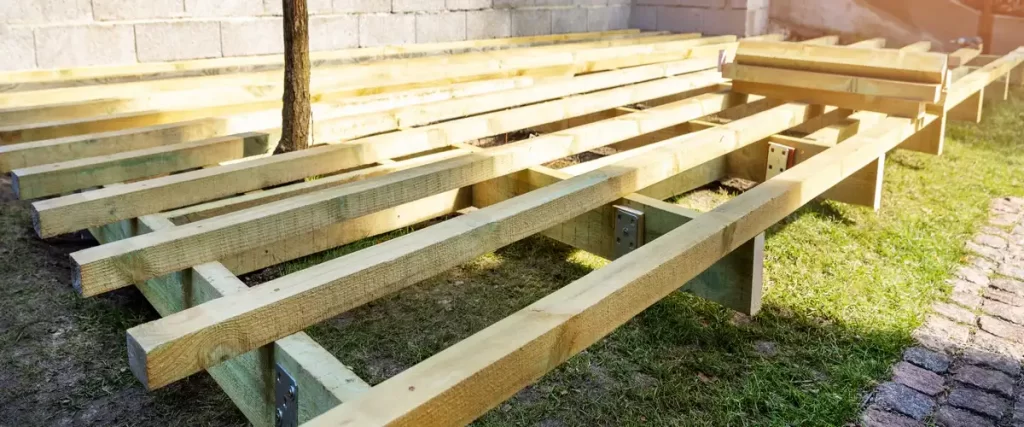
Step 4: Build the Deck Frame
Now the fun part begins. Your deck frame consists of:
- Rim joists that form the perimeter
- Interior joists spaced 16 inches apart
- Double joists, where you’ll create the tree opening
- Add blocking between joists to prevent twisting
If you’re attaching to your house, install a ledger board first. Make sure it’s level and properly flashed to prevent water pooling against your home.
Here’s where building a deck around a tree gets interesting: you’ll need to frame an opening. Run two joists on either side of where the tree will sit, then connect them with crosspieces. Leave a few inches of extra space for growth.
Step 5: Frame the Tree Opening
The tree opening requires extra attention. You need:
- Two parallel joists flanking the tree
- Cross-blocking to maintain structural stability
- A small gap between the tree trunk and decking (minimum 2-3 inches all around)
- Extra support under the opening area
Think of it like building a picture frame within your deck frame. The opening needs to be structurally sound even though there’s no support beneath it.
Step 6: Install Deck Boards
Lay your decking materials perpendicular to the joists. Start at the house and work outward, or begin at the tree and work in both directions.
- Use deck screws or hidden fasteners for a clean look
- Maintain consistent spacing (about 1/8 inch) between boards
- Cut boards to fit around the tree opening
- Leave room for the tree to sway in the wind
Don’t attach decking directly to the tree. Ever. The tree moves, grows, and changes with the seasons. Your deck doesn’t. Locking them together is asking for trouble.
Step 7: Add Stairs and Railings
Most decks need stairs for access and railings for safety. Make sure they meet local building codes:
- Stair treads should be uniform
- Handrails at proper height (typically 34-38 inches)
- Balusters spaced close enough for safety
- Structural connections that won’t create wobbly railings
If you need more guidance on specific building requirements, check out how to build a deck the right way for detailed steps on stair and railing installation.
Design Ideas for Decks Around Trees
Circular Opening Design
A circular cutout looks organic and allows maximum clearance for future growth. It’s trickier to frame than a square opening, but the visual effect is worth it. You can add a circular bench around the tree for seating that follows the natural shape.
Hexagonal or Octagonal Pattern
This approach creates interesting angles and makes the tree feel like an intentional design element rather than an obstacle. The geometric shape adds visual interest to your outdoor space.
Multi-Level Deck
If you have a slight slope in your yard, consider building different deck levels. Position the tree on a lower or upper tier, which gives you flexibility in framing and creates dynamic outdoor living space.
Integrated Bench Seating
Build a bench that wraps around the tree opening. It provides seating, defines the tree area, and adds a finished look to your deck design. Just remember: the bench can’t touch the tree.
Common Mistakes to Avoid
Let’s talk about the stuff that can go wrong:
Building too close to the trunk. Trees grow. That opening that seems generous today will be tight in five years. Give yourself breathing room.
Ignoring tree roots. You can damage or kill a tree by cutting major roots. Take time to work around them when you dig holes for deck posts.
Not planning for drainage. Water needs somewhere to go. A slight slope (about 1/4 inch per foot) away from your house prevents water from pooling on the deck surface.
Skipping permits. Seriously, just get the permit. Wake County and most NC localities require permits for deck construction, and inspectors check for safety issues you might miss.
Using low-quality fasteners. Cheap construction screws rust and fail. Use proper exterior-grade hardware.
Maintaining Your Tree and Deck
Your work isn’t done when construction ends. Regular maintenance keeps both your deck and tree healthy:
- Inspect the tree annually for signs of stress or disease
- Check that the gap between the trunk and decking remains adequate
- Clean debris from around the tree opening
- Apply deck sealant or stain as needed
- Watch for any lifting boards that might indicate root growth underneath
The tree will continue growing, so you might need to adjust the opening in a few years. Plan for it now, and the modification will be simple later.
Frequently Asked Questions
How much space should I leave around the tree trunk?
Most experts recommend a minimum of 2-3 inches on all sides, but 3-6 inches is better for long-term growth. Larger trees need more space. Measure the trunk diameter, then add at least 4-6 inches to that measurement for your opening.
Can I attach anything to the tree?
No. Don’t drill into the tree, attach brackets to it, or fasten deck boards to the trunk. The tree needs to move independently from your deck. Any attachment points will damage the tree and compromise your deck’s structural stability.
What if the tree dies after I build the deck?
If the tree dies, you’ll need to remove it and modify your deck. You can fill the opening with additional decking, convert it to a planter box, or install an umbrella stand. It’s not ideal, but it’s fixable. That’s why choosing a healthy tree matters so much at the beginning.
Do I need special permits to build around a tree?
You need the same permits required for any deck construction in your area. The tree doesn’t usually add extra permit requirements, but check with your local building department to be sure. They’re the final authority on what’s required.
Can I build a deck around any tree species?
Some trees work better than others. Strong hardwoods like oak and maple are ideal. Fast-growing trees with shallow roots (like willows or poplars) are trickier. Avoid trees that drop excessive sap, large seed pods, or have invasive root systems.
How do I deal with tree roots while installing deck footings?
Work around them. If you encounter a root thicker than 2 inches, move your post location. Small roots can sometimes be trimmed, but always consult an arborist first. A few moved posts won’t ruin your deck layout, but killing the tree definitely will.
When to Call the Professionals
Look, we’ve covered a lot of ground here. Building a deck around a tree involves carpentry skills, knowledge of local building codes, understanding tree biology, and, honestly, a fair amount of problem-solving when things don’t go as planned.
Maybe you’re reading this and thinking, “That’s more complicated than I expected.”
You’re not wrong.
Between getting the permits, calculating load requirements, framing around the tree while protecting roots, ensuring structural stability, and making everything look good, there’s a lot that can go sideways. One measurement mistake can mean rebuilding entire sections. One wrong cut near the tree roots can damage something that took 50 years to grow.
If you’re feeling overwhelmed, that’s completely normal. Most homeowners are. That’s where we come in.
At Raynor Shine Construction, we’ve built dozens of decks around trees. We know how to work with nature instead of against it. We handle the permits, do the measurements right the first time, and build decks that’ll last for decades. Plus, we won’t accidentally kill your favorite oak tree in the process.
We’d love to help you create the outdoor living space you’re imagining, complete with that perfect tree providing shade right where you need it. Want to skip the stress and get it done right? Call us at (910) 985-8064 or message us here and let’s talk about your project.
While you’re thinking about your deck, you might also want to explore our deck building services if you’re lucky enough to have waterfront property. Docks and decks actually share a lot of construction principles, especially when it comes to working around natural features and ensuring long-term durability.
Your backyard is waiting to become something special. Let’s make it happen.